Showing posts with label baby/kids. Show all posts

Tuesday, March 9, 2010

Appliqued Onesies

Remember when your baby is just too tiny to put in real church clothes? I've seen these on a couple babies and think they are just darling! My little man is definitely going to be sporting this darling piece!

This is perhaps the easiest little project I have ever done. Seriously you could make a whole package of onesies in less than 10 minutes! And you can do this project even if you don't have a sewing machine... isn't that awesome? And the price to make these is under $2/shirt.

What you need:

1. Onesies
2. Fabric (use your scraps, you just need a little!)
3. Fabric Fusion Applique Paper (1 yard will go for ages...)
Note: There is non-sewable applique paper, and sewable... this depends on whether you want to sew a stitch around the edge of your design for a more finished look. The non-sew is a little more stiff and harder to sew through.
4. Scissors
5. Iron

Directions:

1. Follow the instructions on the Fabric Fusion Applique paper. Basically, you lay the applique paper over the back side of your fabric, with the paper side up. Iron it on low for 2 seconds until it sticks.
2. Cut out your design.
3. Peel the paper off the fabric and place the design on your onesie. Iron for 8-10 seconds until it sticks to the onesie. Done!

Here is the pattern I used to do the tie: (Just click to enlarge, and then print.)

Wednesday, March 3, 2010

Superhero Towels

Months ago I did a post about the reversible superhero capes. I think they are darling, and I think it is a great project and gift idea... but let's face it- by now we have all seen them and it isn't as creative of a gift anymore. I was browsing through Martha Stewart's crafts from last year and came across this great project. It isn't something I have seen before at boutiques or stores, and I think it would be a darling gift for any little boy in your life. I plan to improvise a little on this project by making it into a hooded towel. This is really easy to do, and you can CLICK HERE to see some easy instructions on how to make a hooded towel. (This website has some other ideas to dress up a hooded towel in case you have a little girl or don't care for superheros.) I have to admit, this is a cool find for me. Hopefully someone else can put this idea to use too.

Tools and Materials
Bath towel
Washcloth
Superhero Cape Template
Reflective fabric
Adhesive agent, such as Steam-a-Seam
Disappearing-ink marking pen
Straight pins
Applique scissors
Button-covering kit

Superhero Cape How-To
1. Download and print the templates, then choose one of the shield shapes and an additional shape, and enlarge the images 400 percent. Cut a piece of reflective fabric into a 12-by-12-inch square. Trace the shield template on the square, then flip the template over and trace again; the templates are in halves, so you'll wind up with a whole symbol. Lay a piece of adhesive agent on the reverse side of the reflective material, cut out the shield, and using a pressing cloth and iron, affix the shield to the towel.

2. Place the lightning bolt or other symbol over the washcloth, and trace the shape using the disappearing-ink pen. Place the washcloth over the shield, and pin in place with straight pins. Sew along the traced line using a straight stitch, and cut away the excess washcloth with applique scissors. Save the scraps to fashion a button. Finish with a zigzag stitch along the lightning bolt.

3. To make a button, cut a circle of fabric that's twice the diameter of the button. Follow the instructions provided with the button-covering kit. Sew the button onto the cape. Measure your child's neck, and sew a scrap of the reflective-fabric shield in the appropriate spot on the cape to form a button loop.


Tuesday, February 23, 2010

A Mother's Day Gift Idea

I thought this was a darling, inexpensive gift idea to give to the Grandm-a's in your life. Nothing melts your heart more than tiny little hand prints. For someone like me, who only has one child at the time, I thought a hand print and foot print would be just as darling. It would also be a cute piece to hang in your child's room. This is definitely an idea I want to try.

More Kids Wall Art

I am expecting a little boy in a few months and I have an animal themed nursery. I don't have anything hanging over the crib yet, and I thought creating three pieces of art, such as this, and printing them on to canvas would be darling. One thing I love about printing onto canvas is that it is safe. I think it looks so good to have art hanging over a bed, but always worry about doing so in case there were an earthquake or something... shattered glass... it makes me shudder. But the lightweight, and fabric of canvas art give me piece of mind without sacrificing style.

Tuesday, January 5, 2010

Nursery or Kids Room Art

This project is just calling my name...


What you need:

  • Three 5 x 5 Paper Mache art boards ($2.99 at craft supply stores)
  • Ribbon for hanging
  • Scissors
  • Acrylic paints and paint brushes
  • Card stock for printing your design
  • Permanent spray adhesive
Handmade nursery wall art

Handmade nursery wall art

Steps:

  1. Remove rope strands from the boards and discard.
  2. Choose a style of ribbon and cut 3 strands the exact same size.
  3. Apply your base coat to cover the brown paper mache. Paint everything, including the back side.
  4. Start painting! It helped me to sketch out my design on the computer before diving into painting. I used acrylic paints and paint brushes. All three boards were given a different pattern in the background.
  5. I drew the elephant in Adobe Illustrator and chose two colors for the elephants. Then I printed them out on card stock and cut them out, leaving a little white border to help them stand out against the painted backgrounds.
  6. I tested out the placement before adhering the paper elephants to the boards. Using permanent spray adhesive, I adhered the elephants to the boards. Tie on the ribbon to hang and your done!

Monday, November 16, 2009

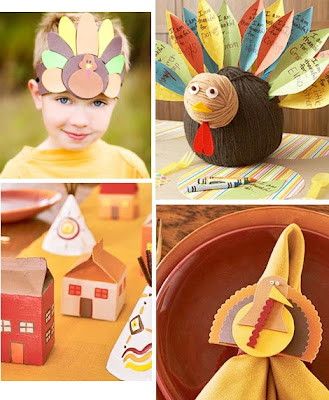
Thanksgiving Craft Project 4 Kids

I thought this was a darling little craft idea to do with your kiddies. With the cold weather arriving, any new indoor projects are greatly appreciated, right?

This wreath makes a very pretty and colorful piece to hang on a door or wall in your home. You will need: Autumn-colored construction paper, scissors, glue, a good-sized piece cardboard, one large paper plate and one small paper plate, and a black marker. The children can make their own, or they can make one together. Basically, you are gluing rolled strips of construction paper onto a circle shaped piece of cardboard. Then at the bottom you add the face of a turkey. The turkey will be the traced foot of a child. Eyes, wobbler, and beak will be cut out using scraps. If you are a teacher, it would be creative to have each student write one thing they are thankful for on a strip of construction paper before you glue it to the cardboard.

Friday, October 30, 2009

final 2009 halloween post!

tomorrow is halloween. are you ready to make it one big special day for your kids? if not, today is your day to prepare. here are a few fun things i have envisioned:

halloween themed breakfast: on the menu is halloween shaped pancakes with orange sides- orange wedges and orange juice!


on the table will be my child's trick-or-treat pumpkin with his new halloween jammies inside, and a special halloween treat.

for lunch, i will probably make those adorable mummy hotdogs, posted here

HAVE A SAFE AND HAPPY HALLOWEEN EVERYONE!

Thursday, October 29, 2009

holiday entertainment will never end

the halloween festivities are nearly over. after all of the pumpkin patches, hay rides, corn mazes, carving pumpkins, roasting pumpkin seeds, modeling costumes, family/friends/church parties, and trick-or-treating... whatever are you going to do with the kids besides eat all of that candy? well, here are some fun ideas to keep you busy and excited for yet another holiday.


Wednesday, October 28, 2009

have a girl? you'll like this.

my friend cassie found this great website/blog that sells baby stuff, mainly little girl things. like adorable bows, and headbands. and best of all, it is super cheap. here are some examples to get you there. the headbands are $2, the hair clips are $1.50, and the burp cloths are 2 for $5. you are welcome!
check them out here


Saturday, October 24, 2009

gobble gobble

i am always so ahead of myself with the holidays. i'm already dreaming of white christmases, and yummy thanksgiving dinners. do forgive me. i saw these suckers/candy? online, and unfortunately there weren't any instructions. i have way more talented friends, and i am sure they could figure out the "how-to". so darling. here are my guesses, but i'm usually wrong! :)
(chocolate covered marshmallow- body? candy corn- feathers? jelly bean- face? heart shaped sprinkle? pretzel- legs? i just don't know?!)


Monday, October 19, 2009

halloween costume photo shoot

being the photo enthusiast that i am, my advice today revolves around pictures. Halloween is creeping up on us. before the busy day arrives, when your kids are jumping off the wall from sugar overload... take an afternoon and let your kids put on their Halloween costumes. take them to a park... or target's photo studio... and have a Halloween costume photo shoot. you will love to look back on their darling little costumes that you, or they, dreamed up. some examples to inspire you...

Friday, October 16, 2009

free nursing cover

go to Udder Covers and get a free nursing cover by typing in promo code 1FREE. you only have to pay shipping which is $8.95. thanks to alissa for finding this deal. mine came in the mail yesterday and they are cute. the promotion is still going on. note: some show they are on backorder... my mom ordered a backordered cover and recieved it the same day i did, so don't be discouraged if the one you like is on backorder.

halloween party games

are you throwing a Halloween party this year? or perhaps you have been asked to help plan your child's class party at school? here are some fun Halloween games that you can play at your party, and they are fun for all ages. all you need to know is included below, but lets just say you will need alot of pumpkins. if you haven't noticed yet, i am not a fan of the "scary" side of Halloween, so everything halloween to me revolves around pumpkins and other "natural" fall items. enjoy! (side note: since most of these aren't "scary" you could use most of these games around thanksgiving also)

________________________________________________________

Pumpkin Golf:

Object of Game: Hit the golf ball into a pumpkin.

Preparation:

  1. Carve out a pumpkin. Make the mouth extra large.

  2. Build a cardboard ramp about one to two feet side from the ground to the bottom of the pumpkin's mouth.

  3. You will probably need some support under the cardboard.

  4. Tape the ramp to the floor for stability.

  5. Mark a starting point a few feet from the start of the ramp. The older the kids, the farther away.

Playing the Game:

  1. Each player gets to hit a golf ball three times.

  2. Each time the ball goes into the pumpkin, the player wins a piece of candy.

Pumpkin Bowling:

Object of Game: Knock over the bowling pins. Make a strike or a spare.

Preparation:

  1. Select several small pumpkins about four to six inches in diameter. You need extras in case a few split or break.

  2. Place plastic (children's set) of bowling pins several feet away on the lawn or floor of the room.

  3. A great alternative to bowling pins are plastic liter bottles. Let the kids decorate them with Halloween objects before the game.

Playing the Game:

  1. Measure off several feet.

  2. Give each child two tries to knock down the pins.

  3. A strike is worth two pieces of candy.

  4. A spare is worth one piece of candy.

Witches Relay Race

Object of the game: Roll a small pumpkin across the room and back, only using a broom stick.

Preparation:
1. 2 small pumpkins, gourds can also be used
2. 2 straw brooms
3. 2 chairs (or any object you can place across the room, where they will have to go anround and return.)

Playing the game:
1. Divide your guests into two teams. Line them up, and play the game relay style.
2. First team to finish, wins.
3. Winners receive a treat.

Pumpkin Bocce:

Object of Game: Roll a pumpkin closest to the big pumpkin.

Preparation:

  1. Carve out a large pumpkin.

  2. Buy several miniature or round sugar pumpkins.

Playing the Game:

  1. Place the big, carved out pumpkin several feet away.

  2. Give each player a small pumpkin.

  3. Each player rolls (No tossing or throwing) their pumpkin and tries to be the closest to the big pumpkin.

  4. The player closest wins a prize or piece of candy.

  5. Play as many times as you want. (Or until you run out of prizes.

Pumpkin Ring Toss:

Object of Game: To toss a ring around a pumpkin.

Preparation:

  1. Carve out a one to three pumpkins.

  2. Buy or make three or four rings about twice as big around as the pumpkins.

  3. If you don't know what to use, try an extra piece of leftover electrical cable and tape together with duct tape. (Scouts use this as a "Reduce, re-use and re-cycle" project)

Playing the Game:

  1. Measure back several feet, depending on age group.

  2. Give the rings to the player.

  3. A piece of candy (or two) is awarded for ringing the pumpkin.

  4. You can award one piece of candy for a partial ring and two if the ring is completely around.

Thursday, October 15, 2009

growth charts

i found these darling growth charts online a while ago. i happened to find this image while i was cleaning up my hard drive. i think if i were to order something like this, i would put it onto a board so that if i ever moved i could take it with me. you can buy it here.

Monday, October 12, 2009

wall shelving

i love shelves- they are an inexpensive decor piece, it adds to the charm of a room, and beautifully showcases your favorite accessories. i especially love them in a child's bedroom. here are some cute pictures of great shelves. (ps: if you are wondering where to find good shelves, ross and tjmaxx always have nice big shelves for under $15)


Wednesday, October 7, 2009

might as well


i was thinking that there are certain things that we buy for our kids around the holidays no matter what. right now i am thinking about halloween. most parents buy a trick-or-treating bucket... most buy halloween pajamas (or "jammies" at my house). i was thinking... rather than just hand over these typical things over to the kids, why not make it a fun gift to get them pumped up for the holiday?

imagine how your child would react when they woke up Halloween morning and found a trick-or-treat bucket with some new jammies, and maybe a special treat? how exciting would that be? so go ahead, take the items you were already planning on buying and make it a special thing for the kiddies.

Tuesday, October 6, 2009

be a good neighbor...

...and start spreading the holiday cheer! i have to say this is one of my favorite holiday traditions. maybe it is because i die laughing watching my hubby doorbell ditch the neighbors and try to stay unseen (he HATES it by the way). perphaps it is the way making a treat for someone brightens my day. or maybe it is the smile that comes to my face every time i see a new "BOO" sign appear in a window. whatever the reason, i love this halloween tradition. in years past, it has always been a pain to make 2 copies of a poem, and as you can imagine, a copy of a copy (and so forth) eventually becomes pretty pathetic in quality. which is why i am loving this BOO poem that i came across this year. instead of advising your neighbors to go make copies, they simply can visit a website to reprint copies for themselves. it makes the process easier, and the quality will remain. so go ahead and spread the holiday cheer in your neighborhood. there isn't anything better than bringing a smile to someone's face.

Friday, October 2, 2009

fall foliage part 2: kids project

while you are having fun arranging fall foliage into beautiful vases, put the kids to work. with the leaves they collected, have them create these fun projects shown below. another great idea is to have them draw the trunk of a tree and the branches, and glue the leaves to their tree. top off this fun activity by making cookies with leaf shaped cookie cutters. who says you can't be super mom?


Tuesday, September 22, 2009

family activities to do in fall

as a stay-at-home mom, i know that some of the best activities are those that get you OUT of the home. from my family to yours, here are some of our favorite activities to participate in during the fall season.

1. hay ride: our family enjoys going to the farm and taking a hayride out to the pumpkin patch.


2. corn maze: take the family to the corn maze and see if you can find your way through the maze without any corn maze helping hints. another fun way to enjoy the corn maze is to split the family into 2 groups and race to see who can get out of the maze first.


3. haunted house: get "spooked" at a haunted house!


4. make caramel apples: after picking fresh apples at the orchard, take them home and make scrumptious caramel apples. i like to make extras and give them away to friends and neighbors.


5. pick apples at the orchards: take your family to an apple orchard and pick fresh apples. i love implementing as much "outdoor" activities as possible before the snow comes in.


6. pumpkin patch: let every family member pick out their own pumpkin. kids always want to find the biggest pumpkin they can, so the general rule around here is "if you can carry it out, you can pick it"


7. stuff a scarecrow: let the kids contribute to the halloween decor this year, and stuff a scarecrow.


8. host a halloween party: invite family, friends, and neighbors over for a party. whether it's a costume party, or a dinner party, celebrate the season with those you love.


9. serve dinner in mini pumpkins: serve your favorite chili or dinner casserole in these pumpkin gourds. the kids will LOVE it.


10. roast pumpkin seeds: an easy activity to do with kids, and a yummy treat to enjoy after.


11. fall foliage: take a drive up the canyon (or a walk) and admire all of the beautiful fall colors. it is the perfect time to take the camera out and get some great outdoor shots of the family.


12. rake the leaves and play in them: every child has fond memories of raking the leaves into one big pile and then jumping in. create some memories for your little ones.


13. "BOO" your neighbors: find a cute "BOO" poem online and attach it to some treats. wait until dark and then leave it on their porch. the poem tells the neighbors to spread the cheer to 2 more neighbors.

Friday, September 18, 2009

nursing cover

I love the new nursing covers that women are using now-a-days. The ease and privacy of nursing your baby without worrying about your blanket falling, or your baby pulling it free is peace of mind to any new mother! I couldn't believe when I saw one in a local boutique for nearly $50! Most women would say it is worth the investment, but I say, why not make an alternative version for cheaper? This is how you can make a nursing cover with items you already have around the home. I plan on making the blanket and the apron straps myself. Wouldn't this be a darling gift idea for an expecting mother?
Step 1

The top part of a nursing cover looks like an apron, so it comes in handy when you are trying to make a nursing cover. Use your scissors to cut off the apron strap.


Step
2

Find a baby blanket that you are not planning on using. It should be wide enough to cover the baby and your chest. A baby blanket made out of 100% cotton will be the right type of blanket to use because it will keep your baby cool in warmer weather.


Step
3

Place the blanket on a flat surface and sew the two buttons in to the middle of the blanket about eight inches apart from each other. Cut a small slit on each end of the apron strap that is large enough for the buttons.

Step 4

Attach the strap to blanket and out it on just like you would an apron. Enjoy nursing your baby in public without having to hold up a blanket!